Easy Home Made Fruit Leather
Those dried, chewy strips of fruit found in the snack and health isle of your grocery store are an excellent replacement for candy bars but command a premium price. Ironic really, if you consider that like jams, fruit leather is just one more way to get additional mileage out of low to middle quality fruits before they go bad. Pretty much any fruit that can be made into jams can be made into fruit leather (i.e. I haven’t had much luck with things like citrus and bananas). One drawback (or advantage, depending on your nutritional outlook) is that the fruit leather described below do not have the powerful artificial preservatives present in their commercial counterparts. As such, they should not be stored for long periods at room temperatures. Either consume within a couple days or freeze for later.
Fruit Sources
Prime candidates for fruit leather include fruits on sale at your grocers, inexpensive local & seasonal fruit and canned fruits that you might need to rotate out of your food storage plan. Another good source, if abundant in your area are foraged fruits. Once you mastered the basic process, don’t be afraid to try some fruit combinations and additives like spices, seeds or nuts.
Prepping the Fruit
First prepare your fruit by washing thoroughly if fresh. Frozen fruits should be thawed completely and any excess moisture drained. Similarly, canned fruits should be drained, but save the liquid from the can in case you need to sweeten or thin your mix later.
Prepping the Fruit Paste

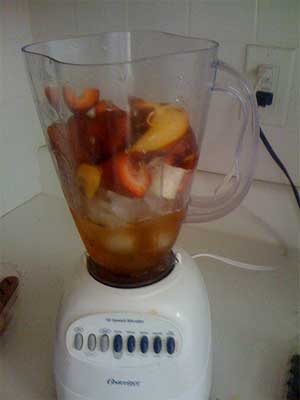
The next step is pureeing. This step reduces the fruit to a smooth consistent paste. This will help create a regular texture and all moisture to evaporate evenly in later stages. The consistency you are going for is that of very thick applesauce. If your mixture is to dry, add TINY amounts of water, mix thoroughly and test the consistency again. Vegetable pectin can be found in most grocery stores and can help thicken up thinner mixtures as can the simmering stage.
This is also a good point to introduce spices and sweeteners (sugar is fine, honey is better but introduces moisture). Remember that warm flavors tend to be more intense but also that the dehydrated final product will be very concentrated. Personally, I find most ripe fruit plenty sweet on its own, but tarter fruits and those lower in natural sugar may call for a little help.
As with homemade jams, adding some lemon juice can improve the results and longevity. I find that about one tablespoon per two cups of fruit does the trick for me.
I’m fond of using the jam setting on my bread maker after the puree stage as it simultaneously reduces, mixes and sterilizes my fruit leather paste without fuss or mess. You can achieve the same results on your stove top though. Using a heavy saucepan, bring to boil while stirring and slowly add any sugar (optional). Reduce the heat after the initial boil and skim any foam from the top. Simmer over low-medium heat for 30 to 45 minutes, stirring frequently, until mixture has thickened suitably. Allow to cool to a safe temperature while preparing your drying surface.
Preparing Your Drying Surface
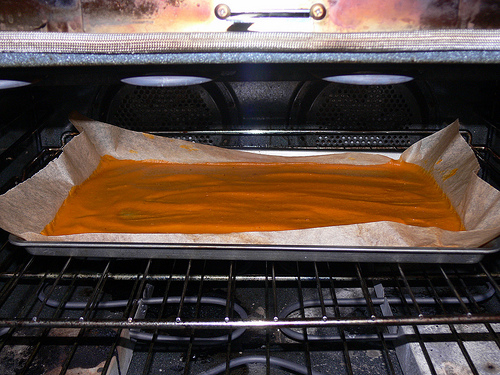
Next prepare a drying surface for your “fruit paste”. I recommend wax paper or parchment paper on a large baking sheet. If you have a food dehydrator lining its trays with wax or parchment paper is an option but be sure to leave enough space to allow air to circulate. Some folks prefer plastic wrap, but if you go this route use the heavy gauge, temperature safe type, not your standard cling wrap. Your fruit layer should be solid, not transparent, no more than 1/4″ thick. Expect this to reduce by about half during the drying process.
Drying Times & Temperatures

A standard oven can be used for drying fruit leather. Set your oven for about 150 degrees for about 6-10 hours. If your oven has an internal fan, consider running it regularly to circulate the moisture laden air out. Otherwise, leaving the oven door slightly ajar periodically will achieve the same result.
Food dehydrators run about the same time to try fruit leather, though generally, no special measures need to be taken to circulate air (after all, that’s what a food dehydrator is suppose to do).
I’ve never tried dehydrating by sunlight, but I suspect that measures will need to be taken to deter pests and a strong, steady supply of sunlight will be necessary. This method may not be practical in areas with high humidity though.
Allow dried leather to cool. Cut dried fruit leather in strips with a pizza cutter or kitchen shears (right through the paper or plastic wrap). Do not remove the paper or plastic. Roll up and store in the refrigerator (short term) or freezer (long term).
Fruit Leather Recipes
Christmas Fruit Leather
- 2 quarts bottled applesauce
- 6 ounces frozen cranberry juice concentrate
- 3-4 tablespoons sunflower seeds or chopped nuts (optional)
- 3 tablespoons of lemon juice (optional)
- 1 tablespoon of pectin (optional)
Prepare as above, but do not add nuts/seed until after applying your fruit paste to the drying trays.
Blueberry Peach Fruit Leather
- 4 peaches peeled and sliced
- 2 heaping cups blueberries
- 2 cups unsweetened applesauce
- 1/2 cup of sugar (optional)
- 1 tablespoon lemon juice
- ½ tablespoon of pectin (optional)
Peach Fruit Leather
- 8 peaches peeled and sliced
- 2 cups of unsweetened applesauce
- 1 tablespoon lemon juice
- ½ tablespoon of pectin (optional)
- 1/2 cup of sugar (optional)
Additional Research:
   |