Raising Chicken Flocks in the City or Country for Eggs, Meat & More!
Whether you have a homestead, farm or simply some spare yard space at your residential home, there is certainly no other
species of animal more suited nor more than the chicken. Meat, eggs, fertilizer, waste disposal, and pest control are among the qualities of the home flock. Because of their comparatively minor outlay, ease of care and short turn around on your effort and money, they are an excellent “starter crop” for individuals looking to dabble in self-sufficiency. With many urban areas loosening or completely repealing their restrictions on suburban and urban farming, there has rarely been better time to give it a go.
Breeds of Chickens
Chickens are generally grouped into three types: meat birds, layers, and dual purpose breeds. Dual purpose birds are an ideal solution to frugal, small scale rearers. A dual purpose breed—one that would be good eating birds and good layers of brown eggs. This is the most difficult stage for a beginner. Out of all the feathered makes and models available, Silver-laced Wyandottes, Rhode Island Reds, and Buff Orpingtons rise to the top in most situations. These are the “heavier” breeds, and the minor trade-offs against laying specialized breeds, will be well worth it when it comes time to butcher birds as they pass their laying age.
Buying Starter Chickens
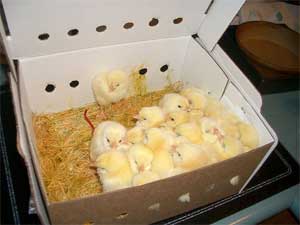
A common offering from breeders is something called a “straight run”. That means that the birds are not sexed (sorted by gender), but boxed and shipped just as they come from the incubators. This may result in several males who will be fast tracked to meat stock. but you generally still get a reasonable number of females and the reduced cost of “straight runs” make them attractive to those trying to keep costs low. If cost is less of an factor, you can buy sorted chicks and immediately focus on getting egg laying up and running. However, remember, once you have a good brood of hens and rooster, you can practically grow your flock at will.
 You have a few other choices in acquiring your birds. In the spring, many feed mills or farmer’s co-ops offer low priced chicks when you buy volume chick starter feed in amounts as small as 50 to 100 lbs. The selection of breeds is generally somewhat limited with these offers, but they can be a good way to get your starter flock. Be sure, however, that before you take advantage of these deals to find out whether you are getting meat birds or laying breeds. For the record, meat birds put on weight much more quickly than laying type chickens. Be sure that if you are wanting layers, that the chick offer is not for males, or cockerels, only. Some of the large laying bird hatcheries use these chick offers to get rid of the male chicks which, obviously, they cannot use. Folks at the store should be able to give you the information you need.
The sale barn or auction house is another source of your starter flock. Be aware, though, that many folks come to these sales to get rid of their old hens and burnt-out roosters. Many chicken ‘collectors’ also frequent these sales and will often run the price up on the more colorful and unusual types of birds. There will, however, probably be several boxes of young pullets and chicks of the more common breeds. Those more common varieties of homestead-type chickens should go at a more reasonable price.
You may also be able to work out a deal with neighbors or friends to provide some starter birds for your flock, either as mature birds, usually older broody hens and randy roosters, or as newly hatched chicks. Check your local classified (both online and newspapers) and you may occasionally come across someone who’s let their flock grow too fast or is looking to move on to another type of livestock.
Mail-order poultry houses are extremely common and in the information age, you have even more ability to shop and compare before choosing a distributor. Probably every one of us has seen in our favorite homesteading magazines the advertisements of the large hatcheries. These mail-order hatcheries provide a much larger selection of chicken breeds than you will probably find available otherwise. The large hatcheries offer the added benefit of not only providing lively chicks, but can vaccinate them, clip their beaks and generally provide better service. It’s their business. And, as surprising as it may seem, the mail never runs slowly with an order of day-old chicks. Almost without exception, mail-order chicks arrive thriving and peeping away. With chick orders, you will be notified of the shipment date by the hatchery. Plan to be on hand for the delivery!
Assuming you are starting with newly hatched mail order chicks, let’s look at getting them off to a good start.
Preparing For Your Chickens
Before your order of chicks arrives, be sure that you have all the equipment for brooding them in place and working. Once they arrive you’ll need to hit the ground running to avoid losses, so make sure you’re ready before placing that order.
 Have a circular brooding area set up. This can be made from pieces of cardboard, metal, or most any other material as long as it provides a draft-free environment and is tall enough to prevent the lively youngsters from hopping out over the sides. (Think about a few weeks down the road, when the little buggers really begin hopping and flopping about.). Although many a bunch of chicks has been brooded in a box behind the old kitchen stove, most folks agree that it is important to use a circular area to prevent the chicks from piling up in a corner and suffocating their siblings. A large plastic wading pool about 5-6 feet in diameter has served as many flocks’ first home.
Suspended a 250 watt red heat lamp about 18 inches above the bedding will provide vital warmth to the young chicks. The important thing is to introduce your chicks to an environment which is about 90-95 degrees. The heat bulb should be raised about one inch per week (thus lowering the temperature) until the birds are old enough to do without it altogether. A cheap thermometer is needed to help you monitor the temperature in the brooding area. You can experiment with lower wattage bulbs if you want to save electricity but remember that Compact Fluorescent Light Bulbs (CFL) do not provide much heat. The important thing is to maintain the 90-95 degree brooding temperature.
A suitably sized brooder box can be placed within your larger circular enclosure and also allow you to use a lower wattage bulb (60 watts or so). This can do the job and save you some money. Use what you have that will get the job done.
Two waterers which screwed onto quart fruit jars provided fresh water for the new chicks. Big box stores and pet superstores may also have inexpensive “vacation water dishes” that use empty 2-liter soda bottles. These are great as they refill with fresh water automatically and reduce contamination. Some breeders advocate that one of the two waterers should be filled with milk to help prevent coccidiosis, a bacterial disease among chickens. Of course, the nutritional value of the milk should also make the chicks grow much faster, too.
Fresh feed was placed in a small feeder away from the light. A loose top bar on the feeder prevented any chick from roosting atop it and soiling the feed. You can purchase one of these or make one quickly and easily in your workshop.
Bedding material can greatly improve the temperature regulation of your chicks as well as reduce hygiene ailments among your brood. Ordinary clean straw with a layer of plain newspaper beneath works very well. Change every couple of days to keep the chicks thriving and healthy. Other recommended materials include ground corn cobs, wood shavings, rice hulls, or any commercial litter. Do not use sawdust for litter. The chicks will eat it.
When Your Chickens Arrive
Immediately upon receiving your shipment of chicks, take each one and dip its beak into the waterer and allow it to drink if it wants. They will most likely be quite thirsty after their journey and this procedure serves not only to give them that needed water, but also to acquaint them with their source of water.
Cannibalism can occur in chick broods in situations of overcrowding, excessive heat or stress. Generally, a weaker bird succumbs or is subjected to aggressive neighbors Smaller batches or dividing up your brood may help reduce this phenomena.
Another remedy is to use a regular toenail clipper to slightly nip off a bit of the top beak and apply a touch or two with a styptic pencil to stem the flow of blood. This process can be dangerous though; cutting too deeply can injure the bird and introduce infection.
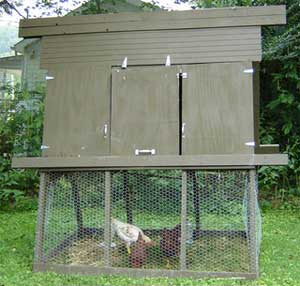
Once the young birds had begun getting their primary wing feathers, you will be able to move them to a chicken house. There, the young birds had more room to scratch and run and should adjust quickly. Fresh feed and water should be present so they become accustomed to their new home and the heat bulb should be suspended from the rafters. Though opinions vary, an elevated house has many advantages in terms of cleaning, safety, hygiene and general convenience.
A fenced chicken run is important to raising healthy “ranging” chickens, accessible by a small sliding door in the chicken house so birds can come and go at will or be isolated as needed. If your birds do not grasp the concept of nesting in the house during bad weather or nightfall, some gentle coaxing may be necessary until they are familiarized.
Chickens are ravenous and thorough and will soon remove every piece of greenery from the area. Some very nice runs are portable and allow you to let parts of the hen yard recover or be harvested of droppings for gardening without fuss. Introducing your grass clippings and kitchen scraps will be well received.
Chicken House Features
One invaluable feature in a chicken house is a clean-out door. In one corner of the building, allow for a small door (about 2 ft. by 2 ft.) hinged at the top that opens to the outside. Turn buttons keep it closed from the outside. Situating it on the highest end of the chicken house, will allow you to move a wheelbarrow directly beneath the opening and shovel the old bedding and manure right into the wheelbarrow without fuss. Positioning your chicken house near any garden will help simplify moving garden scraps to the bird and droppings to the plants.
Chickens have a strong roosting instinct when they aren’t feeding or laying. These are simply elevated posts or surfaces that can be simply made of just about anything. Sassafras poles used as roosts will help repel mites. The wood contains oils which help to repel pests. They grow abundantly in thickets and become straight and tall as they stretch and compete for sunlight. The larger ones (2 inches or so at the butt) make the best roost poles. Incidentally, the smaller ones (1-1½ inches) make terrific bean poles. If you don’t have sassafras in your area, don’t worry, other saplings, bamboo or refuse wood can suffice.
Speaking of mites, routine inspections will go a long way towards preventing larger outbreaks before they get a hold on your brood. Whenever you scoop out the old litter to be used on the garden, give the chicken house floor a good sweeping. if your birds scratch inordinately (all chickens will scratch SOME) consider mite treatments or more thorough cleaning.
Nest Boxes
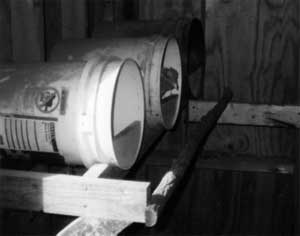
There seem to be as many preferences in next boxes as there are chicken brooders. All agree though, that without a nesting area your birds will either lay fewer eggs, you’ll lose many eggs to breakage and you may have to hunt around for the ones that survive. One solution is to use 5-gallon plastic buckets. Cut a couple of support boards to cradle three of the containers in one corner of the chicken house. Cut the lids to provide a short banner to keep straw and eggs inside the nest where they belong. The finished nests can be anchored with a couple of nails to the supports. A roost pole in front of the boxes provides a surface for the birds to come and go from.
Good feeding of your flock is an important concern. After the birds are mature, you will need to switch from a growing mash to a laying mash if egg production is your goal. The high-bred hybrid meat birds will be ready to butcher in about 10-12 weeks. Layers should begin production in about 20 weeks or so. This gives you an idea on the time table for switching feeds.
Confined birds to the run will produce larger, more tender birds more quickly, however, once they are well accustomed to their roost you may want to let them run loose and find shade and scratch where they will to supplement their diet and produce more flavorful birds. This may not be practical if you live in an area with predatory wild animals, wandering cats & dogs or a yard that is easily escapable. Limiting their outings to dusk will encourage them not to wander as far, but dusk is also a popular hunting time for many predators including cats, foxes, owls and coyote.
With our initial experiment of three dozen birds, we intended to butcher about two dozen and keep a standing flock of one dozen as egg producers (selecting the best layers as “keepers”). We have ended up with birds in the freezer, and more eggs than we could possibly use. If you find yourself in the same situation or if you want to make a little side money, post a sign out on the mailbox, and if you have any foot traffic at all, you may find yourself able to sell every extra egg you get! In fact some fellow amateur brooders claim the demand regularly outstrips the supply.
Chicken Rearing Hints and Tips
Locate your chicken house as close as practical to your house and garden. If you locate it just an extra 25 feet away than need be, then you will end up putting in about 25 extra miles of walking over a year’s time. That equals about eight hours of extra effort.
 Pay attention to the shape of the eggs you get. Old-timers say you can predict the sex of the chickens which will hatch from them. Reportedly, the longer eggs will produce rooster chicks and the more rounded ones, hens.
If you have birds which tend to fly out over the top of the chicken yard fence, you can easily remedy the problem without tying a brick to their leg. Slip in after dark while the birds are on the roost and take up the winged escapee. With a pair of scissors, clip a couple of inches off of the primary wing feathers on one or both wings. The resulting loss of lift should keep the offender grounded. Even after the feathers grow back, the chicken will have adapted to being grounded and be much less likely to repeat his/her escapades.
Chickens maximize egg laying with about 14 hours of daylight each day. Even in areas that don’t get this much sunlight all year round, you can extend laying through most of the winter by adding a cheap timer to a 60-75 watt lamp in the chicken house. An adjustable timer can be set to add a few hours of light each evening to reach the needed optimal 14 hours.
Be absolutely certain to have a good supply of fresh water available for your birds at all times. Failing to do so will squelch your egg production quickly and in hot weather, jeopardize your entire brood. Chickens don’t have any particular adaptations that make them any more drought resistant than you or me.
Consider putting a capful or two of apple cider vinegar in your chickens’ water. It will provide minerals which they need to produce strong, healthy eggs.
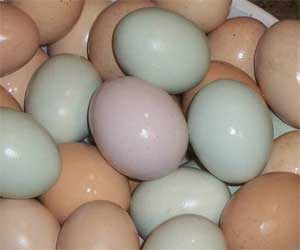
If you want to sell eggs, consider getting breeds which produce brown eggs. For some reason, many folks prefer the brown shelled eggs over the white ones. The taste is indistinguishable to me, but people seem to consider brown eggs healthier and more appealing in general. If you really want to be a hit at the markets and fairs, there are even breeds that produce colored eggs such as Ameraucana (blue & blue-green), Barnevelder (dark reddish brown) and Welsummer (terra cotta). Very popular among the artisan cooking crowd and the kids adore them.
Additional Research:
   |

