Firemaking Tools: Introduction to Making & Using a Bow-Drill
When you are first learning bow-drill fire-making, you must make conditions and your bow drill set such that the chance of getting a coal is the greatest. If you do not know the feeling of a coal beginning to be born then you will never be able to master the more difficult scenarios. For this it is best to choose the “easiest woods” and practice using the set in a sheltered location such as a garage or basement, etc. Remember to unplug your smoke alarms!
Wood Selection
Even if you have never gotten a coal before, it is best to get the wood from the forest yourself. Getting it from a lumber yard is easy but you learn very little. Also, getting wood from natural sources ensures you do not accidentally get pressure-treated wood which, when caused to smolder, is highly toxic.
Here are some good woods for learning with (and good for actual survival use too):
- Eastern White Cedar
- Staghorn Sumac
- Most Willows
- Balsam Fir
- Aspens and Poplars
- Basswood
- Spruces


There are many more. These are centered more on the northeastern forest communities of North America. A good tree identification book will help you determine potential fire-making woods. Also, make it a common practice to feel and carve different woods when you are in the bush. A good way to get good wood for learning on is to find a recently fallen branch or trunk that is relatively straight and of about wrist thickness or bigger. Cut it with a saw. It is best if the wood has recently fallen off the tree. Willow and aspen often break off limbs, especially in ice storms. If no green wood can be found, then use solid dry wood. Cedar can often be found in pretty good condition as standing skeletons. Avoid sections of wood with lots of knots and wood with cracks in it (checks).
Once you have a good section of wood (the more, the better), split it in half with an axe (or knife) to let it dry. A branch the diameter of your fist and a couple of feet long is a good size to work with. You want to have lots of material to experiment with as you burn through boards and spindles. Let the wood dry for about a week in the sun if possible, longer in the shade. Now you can make your set.
A Note on Knives
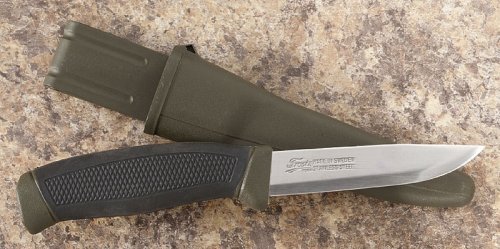
Make sure you have a comfortable knife to work with as this will make things more enjoyable and safer. I suggest a light knife with a blade of about 1/16″ thickness. Thinner blades require less effort to be pushed through wood. Avoid knives with finger guards as these just get in the way. A relatively short blade (about 3″) is easier to work with. The handle shouldn’t have any sharp, boxy angles or uneven surfaces. Keep your knife sharp. Many knives will do. Mora knives form Sweden are very nice and inexpensive. Don’t hesitate to use the ground as a work surface for bracing the wood against. The more stable the wood you are carving is, the better.
Making the Set
There are five parts to the bow-drill set. The bow, the string, the spindle/drill, the board, and the handhold. The drill spins against the board on one end and is held vertically by the handhold at the other end. The drill is spun by the bow and string.

The Board:
Taking the once-split branch, cut it with a saw or whittle and snap it into a foot long length. Using an axe or a knife and baton (a short, sturdy branch for hitting the back of knife blades) combination, split the branch evenly down the middle. Keep splitting until you get a flat board that is about one inch thick, or the thickness of your thumb. Whittle it down to remove any protrusions so you end up with a flat, straight-sided rectangular shape (this isn’t very important). The board should be about three inches wide, but anything greater than two inches is fine.
The Spindle:
Take a foot-long straight-grained section of wood (if possible, from one of your previous splits) and whittle it into a slightly less than one-inch diameter straight dowel. In other words, the dowel should have the same diameter as the first knuckle of your thumb. Whittle the last inch of each end into sharp points. The fatter the spindle, the less wear it places on the string, but a longer bow is required to result in the same amount of rotations taken per bow stroke. Essentially, this works the same way as the gearing on a bicycle.
The Handhold:
Take the other half-split branch and saw off a section approximately four to five inches long. Whittle down the edges to remove any rough spots and to provide a comfortable surface for gripping. On the flat side of this, exactly in the center from all four sides, gouge a hole with the point of your knife. Make the hole about half an inch deep. Make the sides of the hole slope out at a 45 degree angle so as to form a cone shaped depression.
The String:
There are a wide variety of materials strings can be made of. These include: nylon, cotton, jute, leather, rawhide, buckskin, and a wide variety of wild plants. In general, use a string that is at least one and a half times the length of your bow. The string should be relatively thick. A thickness of a quarter-inch will last a long time. Shoelaces are usually not thick enough for repeated use. Cotton hockey skate laces will do. It is best to avoid synthetics such as nylon as they sometimes melt from the friction unless thick enough. Thick cotton cord is just about ideal for repeated use.
The Bow:
Find a section of a green (live) branch that is about the thickness of your index finger and almost straight or slightly curved and the length of your arm from elbow to fingertip. The bow should be reasonably flexible but not flimsy. It should not want to bend more than two inches from a straight line when flexed using a little strength. If it bends too easily or is prone to snapping, find a slightly thicker branch or use a denser wood. If it hardly bends at all then you can carefully whittle off a little wood on the inside of the curve. Make sure it bends evenly to avoid weak spots. The flexibility of the bow is important in the overall feel of the set. If the bow doesn’t bend, the string will slip frequently and soon break. If the bow is too flexible the string will also slip and you won’t be able to apply the torque that is required.
Split the first two inches of each end of the bow with a knife. This is why you need a green branch. A dry branch will not split properly. Make sure the split is even and doesn’t run off to the side. The orientation of the split is very important if the bow has any curve.. When the bow is set on a flat surface, the splits should be parallel to that surface. Take two short lengths of cordage and snugly tie them around halfway up the splits. Use square knots of some other knot that will not work loose.
The clove hitch is very good for this. Tie one end of the bowstring into a knot. Set this end into the split in the bow so the knot is on the side of the bow that is curving away from itself (convex). Make sure that the string is held tightly by the split by moving the short section of cordage up the split toward the bowstring. This will effectively tighten the split. Take the other end of the bowstring and repeat on the other side. The amount of slack in the string is something that must be adjusted through trial and error when you fit the spindle. For now the string should be somewhat loose or you won’t be able to load the spindle.
Technique & Form
If you are right-handed, hold the bow with this hand. Place the board flat on the ground so it is stable. Take your spindle and push the point into the board so that you make a mark. This mark should be about one full spindle width from the edge of the board (about an inch). It should also be at one end of the board so that you have room to place your foot. With your knife, gouge a shallow hole similar to the one in the handhold.

Now, put your left foot on the board (if you are right-handed) so the inside ball of your foot is next to the shallow gouge. Your right knee should be on the ground and you should be sitting on your right foot. Your right leg should be parallel to the board. Another possibility is to raise your butt off your foot and lean your chest on your left knee -use whatever works for you.
Load the spindle by wrapping the string around the spindle so that the spindle is outside of the bow. This may require some adjusting of the string. The spindle should feel like it’s going to pop out. The tighter the string becomes, the better, just don’t make it so tight that it breaks the bow. Holding the loaded spindle and bow in your right hand, place the bottom point of the spindle into the hole in the board. Cap the other end with the handhold and apply some pressure to keep the spindle from popping out. Let go of the bow. The bow should be pointing itself up towards you. If it is pointing down, reload the spindle so the bow is pointing up.

Burning In
You can now begin the “burn-in” process. This is to form the handhold hole. Simply begin stroking the bow back and forth slowly. Keep the pressure on the handhold fairly high. Eventually, you should see a small amount a smoke forming at one or both ends of the spindle. Pick up a little bit of speed until both ends are smoking. It is most important that the handhold end smoke at this point. If it refuses to, even when you pick up the speed and push down harder, reload the spindle so the top is now the bottom and vice versa. Repeat until the handhold starts to smoke. Keep going until the hole in the handhold is the same diameter as the drill. It should match the curve of the drill point exactly now.
Now you must lubricate this end (keep track of which end is up and which is down!) This is to keep it from smoking and taking away your energy so all your power can be focused on the lower end. Unload the spindle and rub the top into the hole in the handhold. Blow off any dust. Push the drill into the handhold as hard as you can and slowly rotate the drill. Again, blow off any dust. Now, rub this end into your hair and along the sides of your nose. This is to transfer the natural oils found on your skin onto the wood. It helps if you haven’t showered for a day.
Repeat the pushing-in procedure. You may want to push the end of the spindle against a smooth rock. This effectively hardens the end of the spindle by compressing the wood. To baseball players, this is known as “boning”. Repeat the pressing of the spindle into the handhold hole and rubbing the tip into your hair until it develops a sheen. Keep all moisture away from this as it will cause the wood to expand and it will bind in the handhold causing friction and burning. You want the frictionless end of the spindle to be very rounded. This distributes the pressure forces over a greater area reducing the tendency of the spindle to drill up into the handhold. If you imagine an electric drill, a small bit will require less effort to drill through a material than a very large one. We want to prevent the drill from burning at this end so we use a large surface area.
Cutting the Notch
You must now make a notch in the board next to the “burned-in” hole so the ground-off powder has a place to accumulate. Take your knife and scribe a 45 degree angle in the top of the board that originates form the center of the hole. The two lines will go to the closest edge of the board. Cut out the wood in between these lines so that you have removed about a one-eighth fraction of the burned-in hole. This slice should go all the way to the bottom of the board so that you have removed a wedge of wood on one side of the board pointing to the center of the drill hole.
Getting the Coal
Place something under the board where the notch is to catch the coal. This can be paper, birch bark, etc. If you are on a floor, the coal will melt it so keep that in mind. Put yourself into the position explained earlier and begin drilling. Be sure to put the lubricated end of the drill in the handhold. You can now begin the first stage, “powder”. Drill slowly and with firm pressure until the bottom end begins smoking. Keep the smoke down to just a wisp. You should see powder accumulating in the notch. Keep this slow pace until the notch is just about filled. Now lighten the pressure and drill very fast. This is the “heat” stage. The idea is to make heat, not powder. It should begin to smoke heavily. If not, apply a bit more pressure until it does. Keep going until you are totally surrounded by smoke. At this point, stop drilling and carefully remove the drill. If there is smoke coming from the powder pile for more than a few seconds you probably have a coal. Gently blow on the coal until it begins to glow red. You may now transfer it to a tinder bundle. This is simply a fist-sized bundle of dry grasses, fibrous inner bark of certain trees, etc. Blow on it until it flames up.
Sometimes you can skip the powder stage and just go for the heat. This is usually when the wood is very dry, soft, and easy to work with. Every piece of wood is different, even from the same tree.
Reading the Powder
If the drill begins smoking in the handhold end you will have to re-lubricate it. You may have to switch the ends of the spindle as one end may be slightly harder than the other. Another solution is to “shoulder” the lower end of the spindle. This is simply reducing the diameter of the last inch or so of the drill. This results in less pressure being needed to drill the spindle into the board. This often solves the problem of the handhold burning as well as the problem of the lower end of the spindle refusing to start burning. Problems can often be solved by looking at the colour and consistency of the powder.
Remember, the suggestions below are for the powder stage. The heat stage should produce the least amount of powder with the most amount of heat. In other words, you should be pushing down enough only to make lots of smoke, but no more powder. If you push down too much you run the risk of making crusty powder and pushing all the good powder you so carefully made out of the notch. This is not so important with dry, soft woods, but is very important when using damp or slightly harder than ideal woods.
Color is associated with speed. Light brown means there is not enough heat being generated, hence you must drill faster. Black means there is plenty of heat generated although you have to be careful not to push too hard. Consistency is associated with downward pressure. Dusty means tiny floury fragments are being ground off. This isn’t so much of a problem in itself, but it usually occurs because there is not enough pressure down and not enough speed. Fuzzy is perfect. This provides the most amount of surface area for combustion to take place. Crusty means there is too much pressure down. This usually occurs in combination with too much speed. This powder will not ignite easily because there is little surface area for combustion reactions to take place.
|
||
|
||
|
||
|
||
|


This will usually allow you to adjust your technique and get a coal. Sometimes however, this isn’t possible. For instance, if you are pushing down as much as you can and still getting dusty powder or hardly any powder at all you have done all you can with technique. Your next option is to shoulder the spindle down a little more as was mentioned before. This way the set will require less downward pressure to produce more powder allowing you to fill the notch with the same amount of strength. A downside of this is that the set becomes more sensitive making it easier to push too hard!
If the problem seems to be not enough speed, there are a couple things you can do. First, you could make another spindle this time a little wider. The wider spindle will generate more heat because the edges of the drill will be traveling faster than the narrower spindle. The second option and probably better is to use a longer bow. This may or may not be of help, depending on how long your bow already is. This allows you to reach higher speeds by taking longer strokes, resulting in less time spent stopping and starting the bow.
Finally, there is the problem of getting powder in the form of little rolls. These look like the rolls you would get after using an eraser. Sometimes these happen because the wood is somewhat damp. Other times, you get these when the wood is a little hard. The best way to approach this, in my experience, is to shoulder the spindle down a bit, build up a good pile of powder (whatever it looks like), and just try to make as much heat and smoke as you can. Usually this results in a coal, but if you are already tired it can be very difficult. (See photo below)

Wrap-Up
It is very important that the fundamentals are learned before attempting the more advanced techniques. If you don’t learn how to read what the wood is telling you, your coal-producing reliability will be unpredictable in the more difficult scenarios. You should be able to get a coal nearly every time you try when using a proven set before you move onto made-from-scratch bow-drills. Keeping a notebook of your experiences and experiments will greatly aid in advancing your ability.
Further Study:

Leave a Reply